

Essential Safety and Steps for Fixing a Roof Leak in the Winter
To fix a roof leak in the winter, start by containing water from inside: place buckets under drips, puncture any sagging ceiling blisters to release trapped water, and move wet insulation away from drywall. From the ground, use a telescoping roof rake to clear snow from the bottom 3 to 4 feet of the roof above the eaves so meltwater can drain. For exterior damage, apply an emergency tarp over the ridge or use cold-process mastic rated for sub-freezing temperatures on cracked flashing and lifted shingles. Always prioritize fall protection and avoid working on icy roof surfaces.
Winter weather along the Wasatch Front creates serious hazards. Snow hides skylights, vents, and fragile shingles, while thin layers of black ice turn standard roof pitches into severe fall hazards. Before attempting any inspection or patch, your top priority must be personal safety.
Working at heights during cold months requires strict adherence to safety standards. OSHA mandates proper fall protection systems for roof work above six feet, including secure anchor points, full-body harnesses, and shock-absorbing lanyards. You must also ensure your ladder is rated for the job, secured at the top, and placed on flat, ice-free ground using ladder levelers or stabilizing boots. Footwear should feature slip-resistant rubber outsoles designed to maintain grip in freezing conditions.
When severe winter weather brings high winds and heavy blizzards, homes often sustain severe snow and wind damage. Navigating these harsh winter conditions means focusing on low-risk exterior actions and managing the water intrusion from inside your home until professionals can safely access the roof deck.
Snow Removal from the Ground
The safest and most effective way for a homeowner to relieve pressure on a compromised roof is to clear snow without leaving the ground:
- Operate a telescoping roof rake: Use an aluminum or composite roof rake with extension poles. Pull snow downward toward the eaves in smooth, gentle strokes. Never chop or scrape against the shingles, as freezing temperatures make asphalt brittle and prone to cracking.
- Establish a clear drop perimeter: Snow loads and dislodged ice can slide off rapidly. Clear the ground below of patio furniture, vehicles, and pets before raking.
- Watch for overhead icicle fall hazards: Large icicles along gutters can snap under vibration. Always stand several feet outside the roof drip line and wear safety glasses and a hard hat.
- Clear the bottom edge first: Focus your raking on the bottom 3 to 4 feet of the roof above the eaves. Removing this perimeter allows trapped meltwater to escape into gutters rather than backing up under your shingles.
Interior Containment and Attic Access
When exterior access is limited by active blizzards or severe ice sheets, interior mitigation protects your ceilings, drywall, and structural framing.
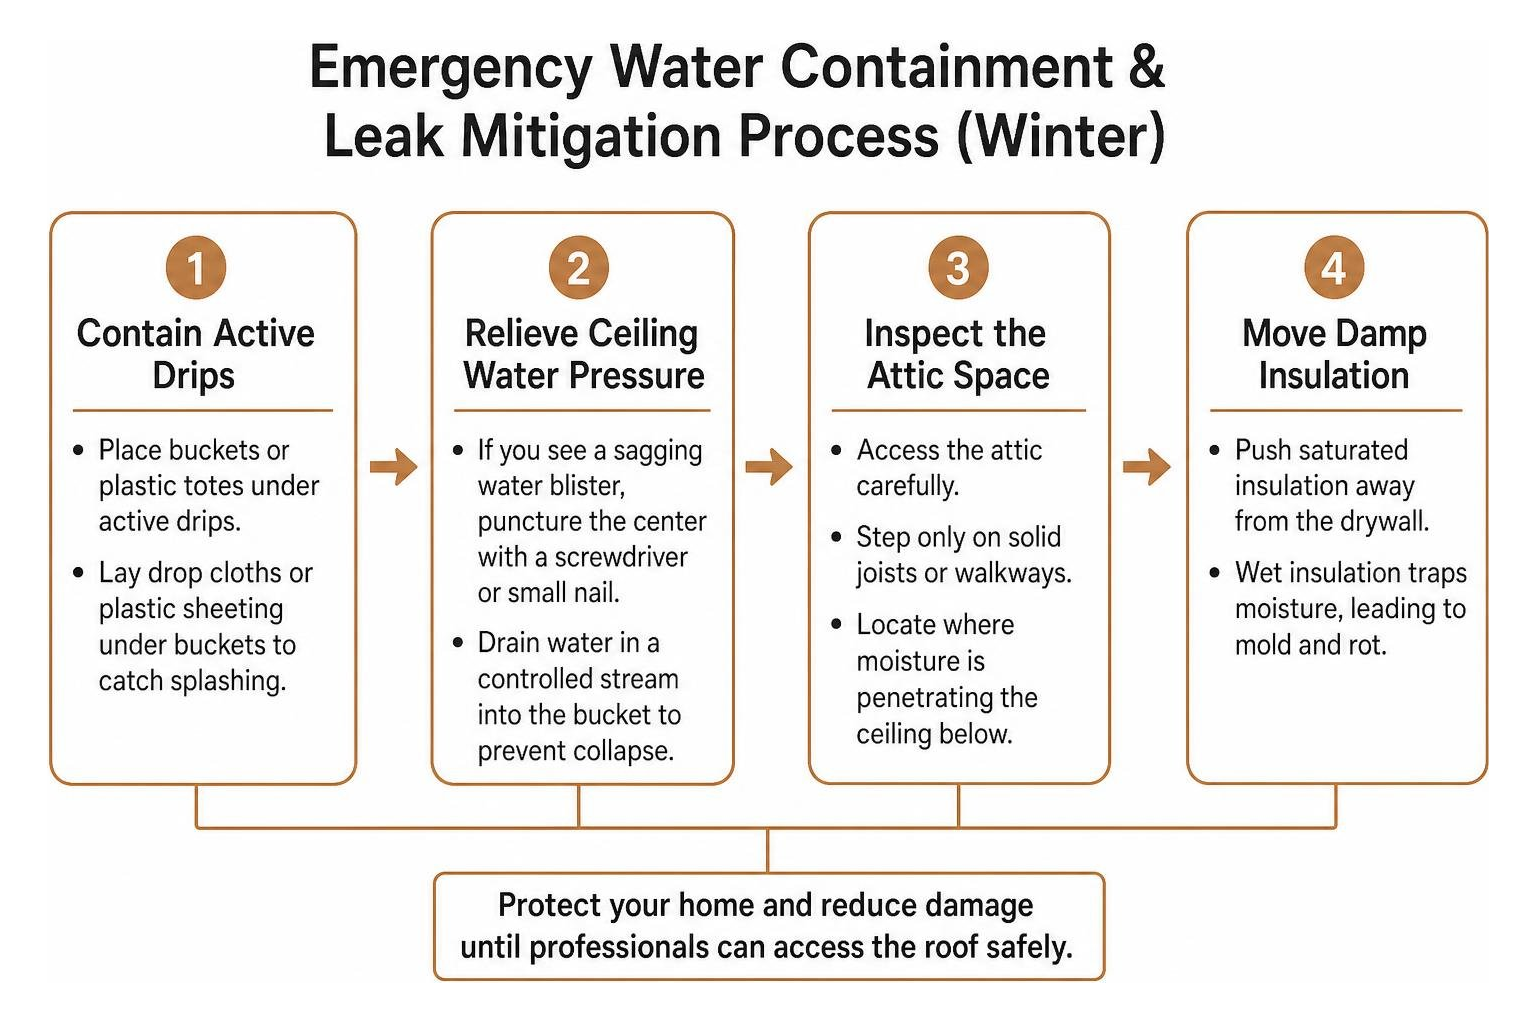
- Place buckets and plastic sheeting: Position large plastic totes or five-gallon buckets beneath active drips. Lay painter’s drop cloths or plastic sheeting under the buckets to catch splashing.
- Relieve ceiling water pressure: If you notice a sagging water blister in your drywall, puncture the center with a screwdriver or small nail. This drains the trapped puddle into your bucket in a controlled stream, preventing a sudden, catastrophic ceiling collapse.
- Inspect the attic space: Access your attic carefully, stepping only on solid joists or walkways. Locate where the moisture is penetrating the ceiling below.
- Move damp insulation: Push saturated fiberglass or cellulose insulation away from the drywall. Wet insulation traps moisture against wooden framing and ceiling drywall, creating mold hazards and accelerating rot.
How to Locate Hidden Winter Roof Leaks
Finding the actual entry point of a winter roof leak requires patience. Water rarely takes a direct vertical path from the damaged shingle to the interior ceiling stain. Instead, water enters an exterior breach, hits the sloped plywood roof deck, and travels along horizontal rafters before dripping through a drywall seam.
To diagnose the problem accurately, consult our comprehensive ultimate roof leak repair guide and use systematic tracing techniques.
Tracing Interior Stains and Attic Rafters
To find the true origin of a leak from inside your attic:
- Inspect structural rafters with a high-lumen light: Turn off ambient lights and use a focused beam to check the underside of the roof deck. Look for dark water stains, glistening frost accumulation, or running trickles along the top edge of rafters.
- Track horizontal travel: Follow damp trails upward toward the roof peak. In winter, surface tension and capillary action allow water to run several feet along a rafter before dropping.
- Check plywood sheathing seams: Moisture often penetrates at the junction between two plywood panels or around unsealed roofing nail penetrations.
- Mark points with high-visibility chalk: Circle the damp areas on the wood sheathing with bright lumber crayon or chalk. Measure the distance from the nearest vent pipe, chimney, or exterior wall so you can pinpoint the exact exterior coordinate once weather permits.
- Use a digital moisture meter: Pin-type moisture meters can verify whether discolored wood is an active winter leak or an old, dry water stain from a previous season.
Identifying Ice Dam Water Infiltration
If your leak appears primarily along exterior exterior walls or directly above windows, the culprit is often an ice dam rather than a broken shingle.
Ice dams form when attic heat warms the upper roof deck, melting the snow blanket. This runoff flows down the slope until it reaches the cold eaves overhanging your soffits. The water refreezes, forming a ridge of ice that blocks proper drainage. As melting continues, the backed-up water pools behind the ice dam and forces its way upward beneath shingle laps. For detailed troubleshooting on eaves and drip edges, explore our guide on leaky roof edge troubleshooting.
Step-by-Step Emergency and Cold-Weather Roof Repair Methods
Cold weather dictates whether a repair should be a temporary stabilization measure or a permanent structural fix.
| Repair Type | Temperature Suitability | Materials Required | Durability Window | Best Application |
|---|---|---|---|---|
| Emergency Tarping | Any temperature / Sub-zero | Heavy-duty poly tarp, 2×4 wood battens, 3″ screws | Weeks to Months (until spring thaw) | Large areas of missing shingles, active storms, untraceable leaks |
| Cold-Process Mastic Patch | Effective down to 20°F–40°F | ASTM D4586 wet/dry flashing cement, roofing mesh | 1 to 6 Months | Cracked flashing, punctured membrane, localized shingle tears |
| Cold-Weather Shingle Replacement | Requires hand-sealing if below 40°F | Pre-warmed asphalt shingles, roofing nails, hand-applied adhesive | Permanent (seals fully during spring heat) | Blow-offs, isolated damaged shingles, hail/tree puncture |
When working on low-slope surfaces, consider specialized emergency mastic applications that adhere effectively to damp, cold roofing membranes.
Emergency Tarping During Winter Weather
A properly secured tarp provides the strongest temporary barrier against winter snow and melting ice:
- Clear the work surface: Sweep away loose snow, frost, and debris using a stiff-bristle broom.
- Select a durable tarp: Use a heavy-duty, UV-resistant poly tarp. Ensure it is large enough to cover the damaged section and extend at least 4 feet beyond the perimeter of the leak in all directions.
- Employ the ridge-overlap technique: Never terminate the top edge of a tarp on the mid-slope of a roof. Always carry the top edge over the roof ridge to the opposite slope. This ensures water running down the roof cannot slip underneath the upper edge of the tarp.
- Fasten using 2×4 wooden battens: Roll the edges of the tarp tightly around 2×4 lumber strips. Fasten these wooden strips directly into the roof deck using exterior wood screws. Never rely solely on tarp grommets or loose nails, as winter wind uplift will tear grommets out within hours.
Cold-Process Adhesives for Fixing a Roof Leak in the Winter
Standard roofing cements become thick and unworkable when temperatures drop below freezing. For cold-weather repairs, use specially formulated adhesives:
- Select winter-grade asphalt cement: Use cold-process cements meeting ASTM D4586 Type I or II specifications (often labeled “wet/dry” or “all-weather”). These formulas contain specialized solvents that remain pliable and sticky at temperatures well below 40°F.
- Store adhesives in heated spaces: Keep tubes and cans of roofing cement inside your heated home or vehicle cab at 65°F to 75°F until the moment of application. Warm mastic dispenses smoothly and penetrates deep into substrate pores.
- Use the three-dot tab sealing technique: When securing lifted shingles or flashing edges, apply three distinct 1-inch dabs of cement under each shingle tab using a putty knife or caulk gun. Avoid spreading cement across the entire underside of the shingle, which can trap internal moisture and cause asphalt blisters.
Shingle Replacement Guidelines for Fixing a Roof Leak in the Winter
Replacing damaged asphalt shingles in sub-freezing weather requires modified installation techniques:
- Warm replacement bundles beforehand: Store replacement shingle bundles indoors for at least 24 hours prior to installation. Cold asphalt shingles turn brittle and will snap when manipulated or nailed on a cold roof.
- Lift adjacent cold shingles carefully: Use a flat pry bar gently to loosen adjacent cold shingles without bending them upward past a 45-degree angle.
- Fasten with mechanical nails: Drive galvanized roofing nails straight and flush through the designated nailing strip. Do not overdrive or countersink nails, as cold fiberglass mats can punch straight through.
- Hand-seal every new tab: Standard asphalt shingles feature a heat-activated factory adhesive strip that requires consecutive days above 40°F with direct sunlight to activate. Because winter temperatures cannot activate this thermal bond, you must hand-seal each tab by placing quarter-sized dabs of winter-grade cement under every tab corner to protect against wind lift until spring.
Preventing and Safely Removing Winter Ice Dams
Ice dams are a primary cause of winter ceiling damage across Salt Lake City and the surrounding mountain valleys. Addressing ice dams requires careful removal methods that protect roofing materials.
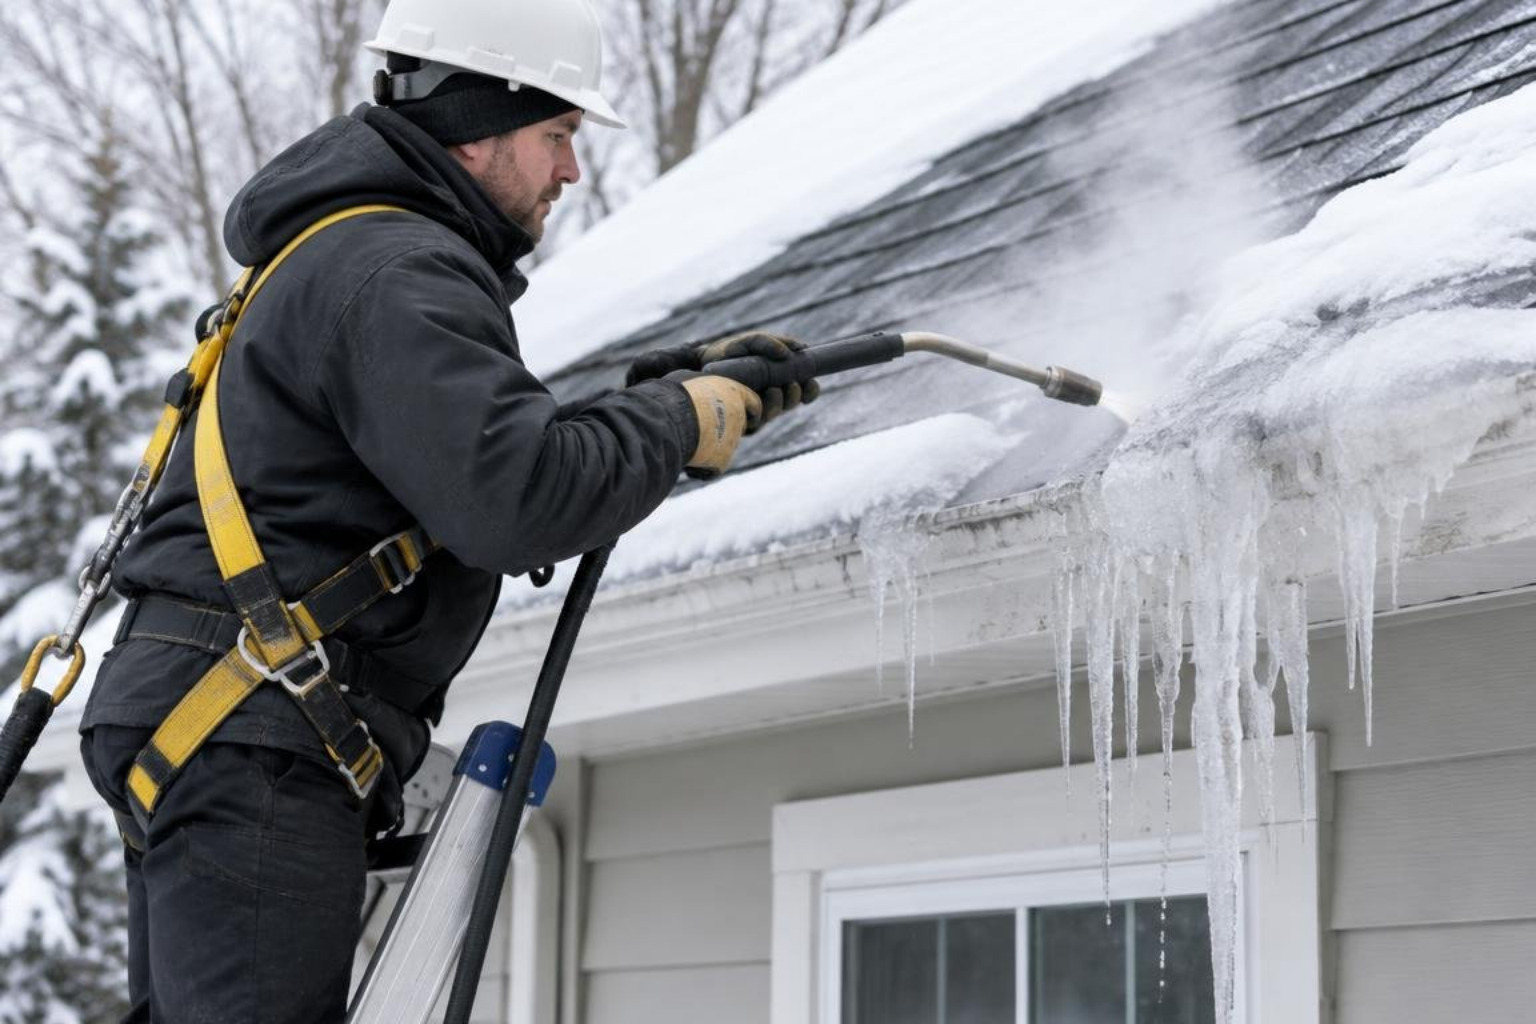
When winter conditions compromise roof structures across mountainous terrain, understanding broader storm damage roofing strategies helps prevent extensive interior renovations.
Safe Ice Dam Removal Techniques
To manage ice dams without damaging your shingles:
- Use low-pressure steam equipment: Professional roofers use dedicated low-pressure steam systems. Steam operates at high temperatures and low pressure, melting channels through thick ice ridges safely without abrading asphalt granules or punching through shingles.
- Apply calcium chloride ice-melt socks: Fill long nylon stockings or permeable cloth tubes with calcium chloride pellets. Lay the filled tube vertically across the ice dam, extending slightly over the gutter edge. The chemical reaction generates gentle heat, creating a clean vertical drainage channel through the ice dam for trapped water to escape.
- Never use axes, hatchets, or picks: Hitting frozen shingles with sharp metal tools will shatter cold asphalt, slice through underlying ice-and-water shields, and cause widespread roof leaks.
Attic Insulation and Proper Ventilation
The permanent solution to ice damming lies in balancing attic temperatures with outdoor air:
- Upgrade attic insulation: Ensure your attic insulation meets or exceeds R-49 ratings (common in northern and mountain climates). Adequate insulation prevents interior living heat from radiating into the attic framing.
- Seal thermal air bypasses: Use expanding spray foam or caulk to seal gaps around recessed can lights, electrical conduits, plumbing stacks, and attic access hatches.
- Install soffit baffles and ensure ventilation: Place rafter baffles along the eaves to prevent blown-in insulation from blocking soffit intake vents. Pair soffit vents with continuous ridge vents to pull cold outdoor air across the underside of the roof deck, keeping the entire roof surface uniform in temperature.
Frequently Asked Questions About Winter Roof Repairs
Is it safe to use a blowtorch to melt roof ice?
No, never use a blowtorch or open flame device to melt roof ice. Applying open flame to frozen shingles creates extreme fire hazards by igniting dry wood rafters, tar paper, or underlayment beneath the roof surface. Additionally, rapid localized heating causes severe thermal shock, instantly destroying asphalt shingle granules and cracking the protective waterproofing layer. Always rely on calcium chloride socks or professional low-pressure steam.
How do I stop a leak if I cannot find the exact hole?
If you cannot identify the exact point of entry due to heavy snow or complex rafter paths, apply the ridge-to-eave tarping method. Secure a heavy-duty tarp spanning from the peak of the roof down to the gutters across the entire suspected zone. This diverts all meltwater directly into your drainage system, bypassing potential punctures. Inside your attic, place wide, shallow galvanized drip pans beneath wet rafter paths to collect stray drips until spring.
Can I replace asphalt shingles in freezing temperatures?
Yes, you can replace asphalt shingles in sub-freezing weather, but you must modify your installation technique. Keep replacement shingles inside a warm building until the moment of installation to prevent cracking. Because factory thermal adhesive strips require ambient temperatures above 40°F and direct sunlight to activate, every replacement shingle must be manually hand-sealed with four distinct dabs of ASTM D4586 winter-grade asphalt cement under each tab.
Conclusion
Handling roof leaks during freezing months demands quick thinking, safe interior containment, and the right cold-weather patching materials. By understanding the dynamics of winter leaks and ice dams, you can protect your living space and structural framing from costly water damage until warmer weather arrives.
For homeowners throughout Salt Lake City, Park City, Draper, Sandy, and across the Wasatch Front, Heaton Bros. Roofing provides rapid emergency assistance, comprehensive inspections, and lasting repairs. As a 4th-generation, family-owned roofing contractor with more than 65 years of local experience, our team knows how to solve winter roofing challenges safely.
To address an active winter leak or plan permanent warm-weather restorations, request an upfront roof repair cost estimate and keep your home protected throughout every season.