
When Your Flat Roof Leaks at the Edge, Here’s What You Need to Know First
A flat roof leaking at the edge is one of the most frustrating — and misdiagnosed — problems a property owner can face. Before diving into the full guide, here’s a quick answer to what’s happening and what to do:
Quick Answer: Flat Roof Edge Leak Causes and First Steps
- Failed or damaged flashing at the roof perimeter — the most common cause
- Membrane pulling away from the drip edge due to improper installation or thermal movement
- Ponding water backing up against the edge and finding gaps
- Clogged gutters forcing water under the membrane edge
- Age-related sealant failure where the membrane meets metal components
What to do right now:
- Place buckets to catch interior drips
- Do not apply caulk — it won’t hold
- Document the leak location and when it happens (after rain? wind?)
- Call a roofing professional for a perimeter inspection
Here’s the part that surprises most homeowners: the water stain on your ceiling is almost never directly below where the water got in. Water enters at the roof’s edge, then travels sideways — sometimes 3 to 6 feet — along joists, insulation, or wall studs before it drips or shows up as a stain. That means chasing the stain alone won’t solve the problem.
Flashing failure is the single most common reason for roof leaks. And at the perimeter of a flat roof, where the membrane must transition to metal components and change direction, there are more opportunities for failure than anywhere else on the roof.
At Heaton Bros. Roofing, we’ve handled flat roof edge repairs across Salt Lake City and the surrounding Utah area — and we know how quickly a small perimeter failure can spiral into rotted fascia, damaged insulation, and costly interior repairs. If you’re dealing with a flat roof leaking at the edge, you’re in the right place.

Quick flat roof leaking at edge terms:
Why You Have a Flat Roof Leaking at Edge Transitions

When we talk about low-slope or flat roofing systems, the perimeter is where the real action happens. While the middle of your roof is a broad, uninterrupted sheet of material, the edges are where different components must meet, overlap, and seal.
According to an industry study by FM Global of over 140 commercial roof losses, a staggering 59% of roof perimeter failures were the primary cause of major roof damage. Why is this area so incredibly vulnerable?
The answer lies in the intense physical forces acting on your roof’s edge every single day:
- Thermal Expansion and Contraction: In Utah, we experience wild temperature swings. A single day in Salt Lake City can start with freezing morning temperatures and end with scorching afternoon sun. As the metal drip edge and the roof membrane heat up and cool down, they expand and contract at completely different rates. This constant tug-of-war places massive stress on the joints and seals.
- Wind Uplift: Wind doesn’t just blow across your roof; it hits the vertical walls of your home and rushes upward, creating a low-pressure vacuum right at the roof edge. If the edge metal isn’t secured tightly, wind can lift the membrane right off the edge, allowing wind-driven rain to blow underneath.
- Drainage and Ponding Water: Low-slope roofs must have a minimum pitch (ideally 1:40) to shed water. If the roof edge is slightly elevated or if the wood decking has settled over time, water won’t drain within the recommended 48-hour window. Instead, it ponds right at the transition, slowly eating away at the adhesives and seams.
To combat these extreme forces, the roofing industry relies on strict guidelines like the ANSI/SPRI ED-1 Design Standard for Edge Systems. This standard governs how edge metals, copings, and gutters must be secured to resist wind and water. However, if your roof was installed without these rigorous standards in mind, edge failures are almost guaranteed over time. For more tips on keeping your low-slope roof in top shape, check out our low slope roof maintenance guide.
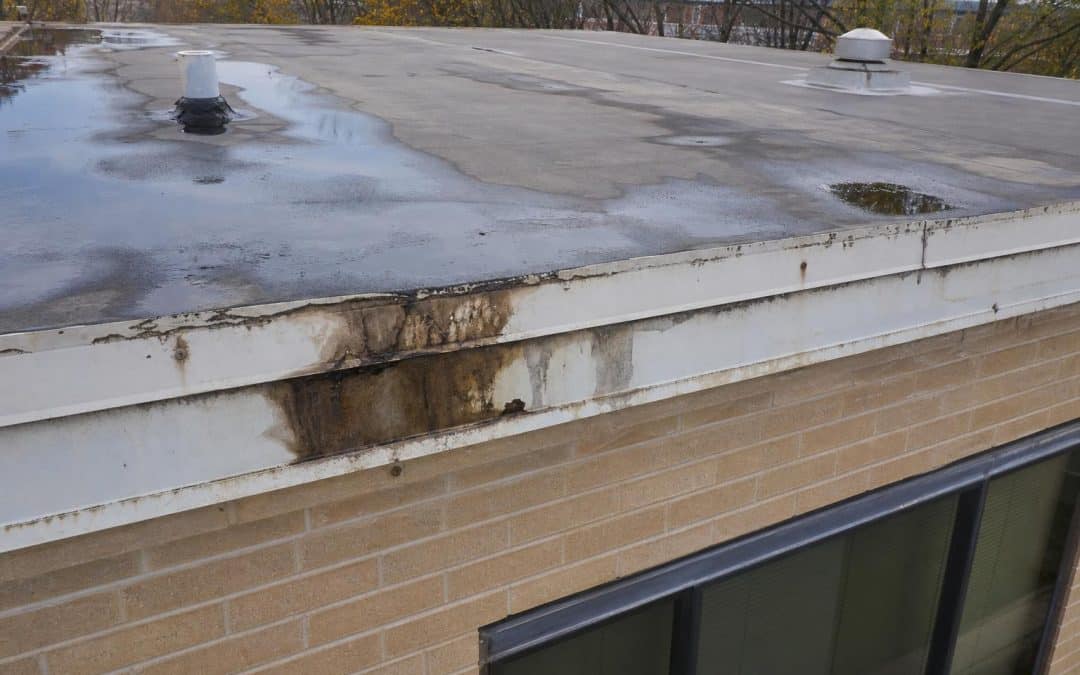
Anatomy of a Flat Roof Leaking at Edge Seams
To understand why a flat roof leaking at the edge occurs, it helps to understand the anatomy of the edge transition itself. On a standard residential flat roof, the edge is typically composed of:
- The Wood Nailer: The solid wood border that provides a secure anchoring point for the edge metal.
- The Drip Edge (or Gravel Stop): An L-shaped metal flashing nailed to the wood edge. Its job is to direct water away from the fascia board and directly into the gutter.
- The Roof Membrane: The waterproofing layer (such as EPDM rubber, TPO, or Modified Bitumen) that covers the roof.
- The Cover Strip / Seam Tape: A specialized adhesive strip that seals the membrane transition to the metal drip edge.
Because metal is smooth and non-porous, and membrane materials are highly flexible, keeping these two elements bonded is incredibly difficult. Over time, metal movement breaks the adhesive bond, leading to membrane separation. Once the membrane pulls away from the metal, water running toward the edge slips right underneath the metal lip instead of flowing over it. You can learn more about identifying these specific failure points in our guide to flat roof edge leak diagnosis.
Installation Mistakes: Priming, Nailing, and Overlaps
While age and weather play their parts, the vast majority of edge leaks we diagnose along the Wasatch Front trace back to avoidable installation mistakes.
- Insufficient Priming: Before applying a membrane or seam tape to metal drip edges, the metal must be thoroughly cleaned and coated with a specialized primer. Many cut-rate installers skip this step or apply the membrane while the primer is still wet. Without proper priming, the membrane will inevitably peel away within a few seasons.
- Improper Nailing: Edge flashing must be securely fastened with corrosion-resistant fasteners. If nails are spaced too far apart, or if installers use nails instead of screws on high-movement areas, the metal will buckle and warp.
- Overlapping Seams and “Lifting” Lips: Drip edge metals come in 10-foot sections that must overlap by at least 2 inches. If these overlaps aren’t sealed perfectly, they create a tiny “lip” that stretches the overlying membrane. As the metal shifts, this stretched membrane eventually splits, creating a direct pathway for water.
Avoiding these shortcuts is the key to preventing early failures. If you’re hoping to address these issues before they turn into major structural headaches, review our list of simple flat roof fixes.
Warning Signs of Perimeter Water Damage

Because water travels laterally, an edge leak can go unnoticed for months, quietly rotting your home’s framing before a single drop of water ever hits your living room floor. That’s why it’s crucial to catch the early warning signs of perimeter damage before they escalate.
One of the first places we look during an inspection is the wood fascia board (the horizontal board running along the edge of your roof) and the soffit (the underside of the roof overhang). When a flat roof leaks at the edge, water runs down the back of the drip edge and saturates the fascia.
Keep an eye out for these exterior red flags:
- Fascia Rot: Dark, soft, or spongy wood along your roofline.
- Soffit Damage: Water stains, peeling paint, or crumbling wood on the underside of your roof overhang.
- Mold or Mildew: Green or black spots forming on the exterior walls just beneath the roofline.
- Peeling Exterior Paint: Moisture trapped behind the paint of your fascia or siding will cause it to blister and peel.
If you notice any of these signs, it’s a clear indicator that moisture has bypassed your roof’s waterproofing. Catching these signs early can save you thousands of dollars in structural repairs. To learn more about what to look for, check out our guide on the signs you need roof repair.
Interior vs. Exterior Clues
How do you know if a leak is coming from the edge rather than a penetration (like a pipe boot or chimney) in the middle of your roof? You have to play detective and look at both interior and exterior clues.
| Symptom | Likely Cause | Action Needed |
|---|---|---|
| Water stains on the ceiling near the center of the room | Penetration leak (vent pipe, HVAC curb) | Inspect interior boots and seals |
| Dampness or water stains running down exterior walls | Perimeter edge leak | Inspect drip edge and flashing transitions |
| Musty odors in exterior-facing closets | Slow, hidden perimeter leak | Check soffits for mold and damp insulation |
| Gutter overflow during moderate rain | Clogged gutters backing water under the edge | Clean gutters and inspect the edge membrane |
If you are seeing water stains on your walls rather than your ceiling, that is a classic sign of a perimeter failure. Water is slipping past the drip edge, traveling down the interior of the wall cavity, and bypassing your ceiling entirely. If you suspect this is happening, read more about when it’s time for roof repair.
Proper Repair Methods and Professional Diagnosis
When we arrive at a home in Salt Lake City or Draper with a suspected edge leak, we don’t just guess where the water is coming from. We use advanced diagnostic tools to find the exact entry point.
Because water can hide deep within the roof assembly, we often perform moisture detection surveys and infrared thermal scans. Infrared cameras allow us to “see” the temperature differences caused by trapped water under the membrane, pinpointing the exact boundaries of the damage without tearing up your entire roof.
Once the leak is located, we must choose the right repair path. Here is how temporary patches compare to permanent professional repairs:
| Repair Type | Expected Lifespan | Pros | Cons |
|---|---|---|---|
| Temporary Patch (Butyl Tape/Sealant) | Weeks to Months | Low cost, quick to apply | Will fail as thermal movement occurs |
| Sectional Flashing Replacement | 5 to 10 Years | Cost-effective for isolated damage | Doesn’t address widespread roof aging |
| Professional Re-Termination | 15 to 25+ Years | Permanent fix, highly durable | Requires skilled professional installation |
If you are dealing with a persistent edge issue, we recommend scheduling an inspection with a local specialist. You can learn more about our options for flat roof repair in Salt Lake City.
Why Caulking Fails on a Flat Roof Leaking at Edge Joints
We see it all the time: a well-meaning homeowner or a generic handyman climbs onto a flat roof with a $10 tube of silicone caulk and slathers it all over a leaking edge joint. Within a few months, the leak is back, and the wood beneath is even wetter.
Why does caulk fail so spectacularly on a flat roof leaking at the edge?
- Thermal Movement: As we discussed, the metal drip edge and the roof membrane are constantly moving. Standard hardware-store caulk simply does not have the elasticity to withstand this daily expansion and contraction. It quickly cracks, tears, and pulls away from the metal.
- Material Incompatibility: Many common caulks and roof cements contain petroleum or solvents that will chemically degrade rubber (EPDM) or plastic (TPO) membranes. Instead of sealing the leak, the caulk actually melts the roof material, making the hole much larger.
- Trapping Moisture: Caulk often acts as a dam, trapping water inside the roof assembly where it cannot dry, accelerating wood rot in the fascia and deck.
While a temporary sealant can buy you a few dry days in an emergency, it is never a permanent solution. To protect your investment, explore how to protect your home with roof repair using compatible, professional-grade materials.
Re-Termination and Adding Membrane Layers
The correct, professional way to repair a leaking edge is through re-termination. This process involves removing the failed edge details and rebuilding the transition from the wood deck up.
Here is how we do it at Heaton Bros. Roofing:
- Step 1: Clean and Prepare: We remove the old, damaged membrane and clean the metal drip edge down to bare, shiny metal.
- Step 2: Dual Membrane Layering: For maximum protection, we install a dual-layer system. First, a base sheet of membrane is applied under the drip edge. Then, the metal drip edge is secured on top. Finally, a second target patch or cover strip is adhered over the top of the metal. This sandwich design ensures that even if water slips past the top seal, it hits the lower membrane layer and drains safely away.
- Step 3: Proper Priming and Adhesives: We apply high-strength, manufacturer-approved primers to the metal before bonding the top membrane layer, ensuring a chemical weld that won’t pull apart.
- Step 4: Mechanical Fastening: We use heavy-duty screws and termination bars to mechanically clamp the membrane down, preventing wind uplift from peeling the edges back.
This methodical approach is what separates a temporary patch from a repair that lasts for decades. Find out how we make this process seamless with our guide to roof repair made easy.
Sectional Repair vs. Full Roof Replacement
If your roof edge is leaking, do you need to replace the entire roof? Not necessarily.
A sectional perimeter repair is often highly effective if the rest of your roof membrane is in good condition. If the leak was caused by a localized installation error (like a poorly sealed drip edge overlap) on a roof that is only 5 or 10 years old, we can simply rebuild that specific edge section.
However, if your roof is approaching the end of its lifespan (typically 15 to 25 years for flat roofs) and the membrane is showing signs of widespread degradation — such as brittleness, cracking, or shrinking — a full replacement is usually the smarter long-term investment. Repeatedly patching an old roof is like putting band-aids on a leaky pipe; eventually, a new leak will pop up right next to your repair. If you’re trying to decide which option is right for your property, read our tips on choosing a reliable flat roof specialist.
Frequently Asked Questions About Flat Roof Edge Leaks
How long should flat roof edge flashing last?
When properly installed using high-quality materials, flat roof edge flashing can last 20 to 40 years. Standard galvanized steel or aluminum flashings are highly durable, while premium copper flashings can easily exceed 50 years of service life.
However, this lifespan can be drastically shortened by harsh weather, physical damage, improper installation, or a lack of routine maintenance. If you’re experiencing issues with your flashing, explore our leaking roof repair services.
Why does water show up on my wall instead of the ceiling?
This is a classic symptom of a perimeter leak. When water penetrates the roof’s edge, it bypasses the horizontal ceiling joists entirely. Instead, it drips directly onto the top plate of your exterior walls.
From there, gravity pulls the water down the vertical wall studs and through your insulation. The water will travel downward until it finds an exit point — often showing up as damp drywall, peeling paint, or mold near the floor or around window frames. To understand why addressing these wall leaks quickly is so important, read why flat roof repair is a priority.
How does wind exposure accelerate edge failures?
Because flat roofs lack a steep slope to deflect wind, the edges bear the brunt of wind-driven storms. As wind hits the side of your home, it rushes upward, creating a powerful suction force known as wind uplift.
If your edge metal is loose or missing fasteners, this wind uplift will repeatedly pull at the membrane, slowly breaking the adhesive bond. Over time, the membrane peels back, allowing rain to blow directly under the roof system. If a recent storm has damaged your roof’s perimeter, check out our options for emergency roof repair.
Conclusion
A flat roof leaking at the edge is a serious issue, but it doesn’t have to be a stressful one. By understanding how water travels, recognizing the early warning signs of wood rot, and avoiding the temptation of temporary caulk fixes, you can protect your property from extensive structural damage.
At Heaton Bros. Roofing, we’ve spent over 65 years helping homeowners and businesses throughout Salt Lake City, the Wasatch Front, and surrounding areas keep their roofs watertight. As a 4th-generation, family-owned business, we pride ourselves on offering reliable, affordable repairs and honest advice.
Don’t let a small edge leak turn into a major headache. Contact us today to schedule a professional flat roof inspection and let our family protect yours!