
Understanding the New Roof Installation Process: Tear-Off vs. Overlay
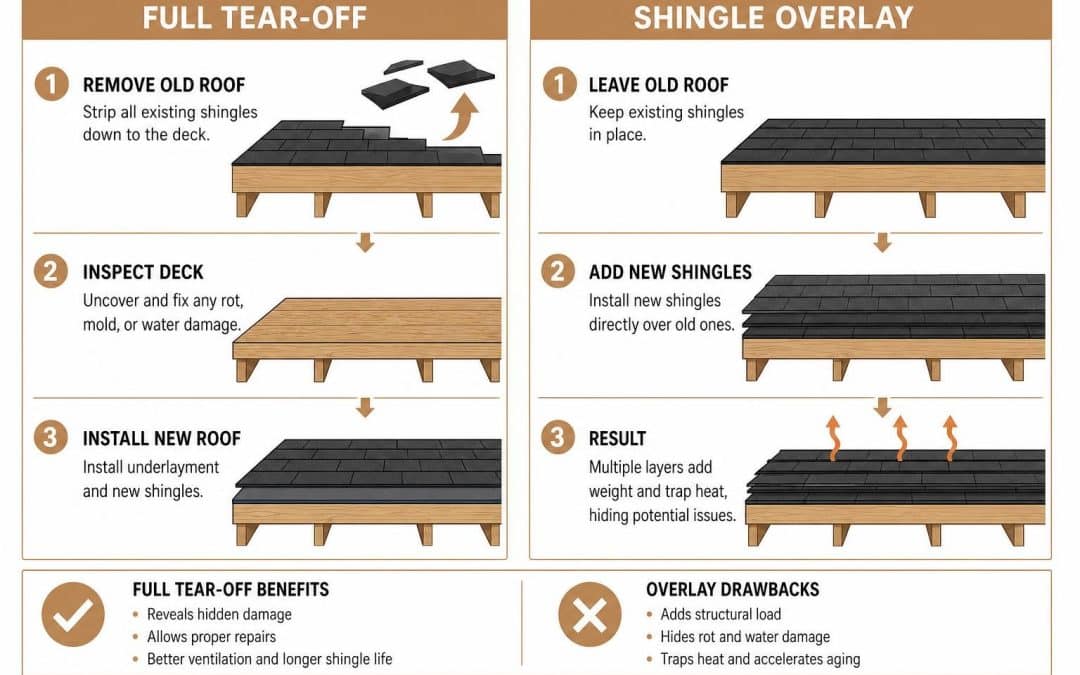
When preparing for a replacement, one of the first decisions you face is whether to perform a complete tear-off or install an overlay (laying new shingles directly over old ones). While an overlay might initially seem like a shortcut to save on labor, it carries long-term structural risks that can undermine your home’s integrity.
An overlay adds 2 to 4 pounds per square foot of structural load to your roof framing. More importantly, leaving old layers in place prevents us from uncovering rot, mold, or water damage hidden in the wooden deck beneath. While the International Residential Code (IRC) permits a maximum of two shingle layers, applying a second layer traps heat, which significantly accelerates shingle aging and often voids manufacturer warranties. To dive deeper into what you should expect during your upcoming project, check out our guide on understanding the roof installation process: what to expect.
Full Tear-Off Mechanics
During a full tear-off, our crew strips the roof down to the bare wooden sheathing. Using specialized roofing shovels, roofers start at the ridge caps and work downward toward the eaves, popping up shingles and pulling out stubborn fasteners.
Once stripped, we sweep the exposed deck clean, pull or flatten remaining nails, and perform a thorough inspection of every sheet of wood. A full tear-off typically adds $1.00 to $2.00 per square foot to the total project cost compared to an overlay, but it ensures a solid, rot-free foundation.
Shingle Overlay Drawbacks
Choosing an overlay creates several critical performance risks:
- Heat Retention: The trapped heat between layers bakes the upper shingles, dramatically shortening their rated service life.
- Improper Fastening: Standard nails may fail to penetrate deeply enough into the solid wood deck below two full shingle courses.
- Compromised Flashing: Flashing around chimneys, dormers, and walls cannot be properly replaced or sealed over an old layer, creating prime leak targets.
- Voided Warranties: Major shingle manufacturers often reduce or completely void warranty coverage when products are installed over existing layers.
The Step-by-Step Residential Roofing Sequence
Every residential roof relies on a continuous, layered defense against water intrusion. Missing or reversing even one step compromises the entire structure. From start to finish, standard shingle projects take one to three days of active installation.
Preparing Your Property for the New Roof Installation Process
Long before the crew steps onto the roof, property preparation ensures safety and protects your home:
- Permits and Logistics: We secure local municipal building permits and position a waste dumpster on your driveway over protective wooden boards.
- Exterior Protection: Tarps are rigged from the eaves down over side walls, flower beds, and landscaping to funnel falling debris safely away.
- Outdoor Clearing: Patio furniture, grills, and potted plants are moved safely outside the drop zone.
- Interior Safety: Heavy vibrations from tear-off and pneumatic nailers can rattle interior walls; homeowners should remove framed pictures, mirrors, and loose wall art before work starts. Learn how to get your home ready by reading our guide to planning a roof replacement: the ultimate guide.
Deck Inspection and Underlayment Sub-Layers
With old materials stripped away, we inspect the roof deck for water staining, delamination, or decay. Damaged section sheets—typically 7/16-inch OSB or CDX plywood—are cut out and replaced. We maintain a 1/8-inch expansion gap between replacement sheets to prevent buckling during summer heat waves.
- Eave Drip Edge: Metal drip edge is fastened along the bottom eaves directly over the wood deck to channel runoff into gutters.
- Ice-and-Water Barrier: A self-adhering membrane is rolled along the eaves, extending at least 24 inches inside the exterior warm wall line to stop ice dams.
- Synthetic Underlayment: Modern water-resistant synthetic underlayment is rolled out across the roof plane, overlapping horizontal seams by at least 2 to 4 inches.
- Rake Drip Edge: Metal drip edge along the gable ends (rakes) is installed over the synthetic underlayment to seal side edges against wind-driven rain.
Shingle Installation and Flashing Integration
With the protective sub-layers pinned down, shingle installation begins at the lower edge. First, a dedicated starter strip course is nailed along the eaves with the factory adhesive strip facing up and outward. This creates a wind-resistant seal at the roof margin.
Architectural field shingles are placed in staggered rows over the starter strip. Roofers drive 4 to 6 hot-dipped galvanized nails per shingle into designated nail zones, keeping standard reveals at 5-5/8 inches.
Where the roof intersects vertical walls or dormers, L-shaped step flashing is woven shingle-by-shingle beneath each row to shed water downward. Valleys are lined with self-adhering membrane and heavy-gauge metal flashing, while worn neoprene pipe boots around exhaust vents are swapped out for brand-new flashings. You can read more about these exact stages in this guide on the residential roof installation process.
Ventilation Math and Ridge Cap Sealing
Adequate ventilation keeps attic temperatures balanced, preventing winter ice dams and summer heat buildup. The standard rule calls for a 1:150 net free ventilation area ratio, split evenly between low soffit intake vents and continuous high ridge exhaust vents.
Once the field shingles reach the peak, a slot is opened along the ridge line to allow warm attic air to vent. Over this gap, we secure a continuous ridge vent covered by specialized ridge cap shingles. Ridge caps are overlapped in the direction of local prevailing winds, and exposed end nail heads are sealed using premium, weather-resistant Lexel clear sealant.
Technical Safety and Quality Standards During the New Roof Installation Process
Roofing requires strict adherence to safety standards and proper equipment. Steep roof pitches demand clear safety limits:
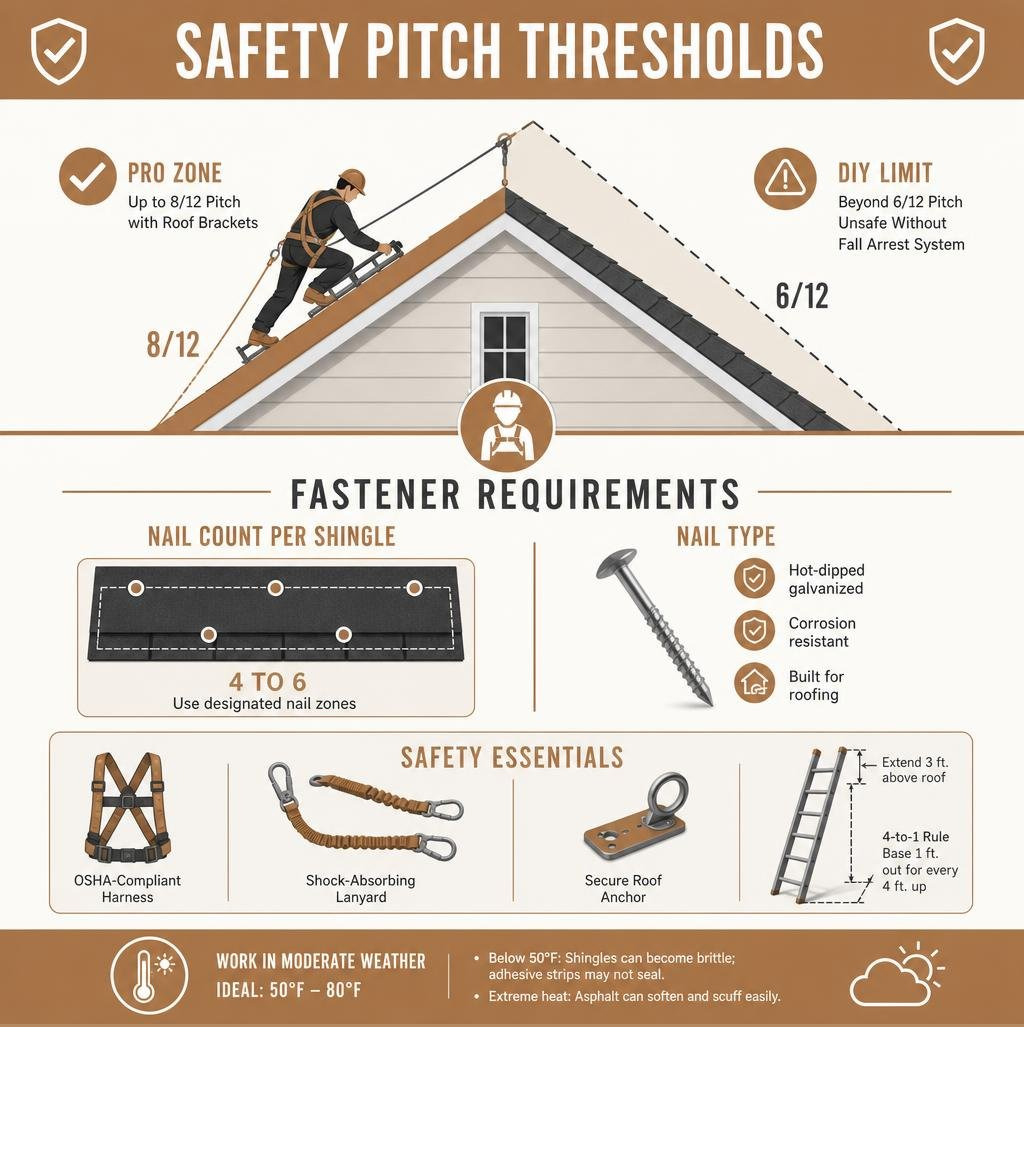
Pro crews work comfortably up to an 8/12 slope using specialized roof brackets, while DIY installations become unsafe past a 6/12 pitch without commercial fall arrest setups. OSHA-compliant harnesses, shock-absorbing lanyards, and roof anchors are non-negotiable essentials.
When setting up extension ladders, enforce the 4-to-1 rule: for every 4 feet of vertical climb, set the base 1 foot out from the wall. Extend the ladder top at least 3 feet above the roof line and secure it firmly to the eave. Work during moderate weather—ideally between 50°F and 80°F. Temperatures below 50°F can make asphalt shingles brittle and prevent self-sealing adhesive strips from bonding, while extreme heat makes asphalt soft and easily scuffed.
Costs, Timelines, and Contractor Red Flags
Investing in a new roof protects your home’s equity. In fact, a quality roof replacement restores approximately 60% of its initial cost to your home’s overall market value upon resale. Labor generally represents 50% to 60% of total project costs, with high-quality materials accounting for the remainder.
If you’re asking yourself how much does a new roof actually cost?, the table below outlines typical ranges for common residential roofing options in 2026:
| Material Type | Cost per Square Foot (Installed) | Expected Lifespan | Typical Installation Timeline |
|---|---|---|---|
| 3-Tab Asphalt Shingles | $3.50 – $5.50 | 20 – 25 Years | 1 – 2 Days |
| Architectural Shingles | $4.35 – $9.80 | 30 Years to Lifetime | 1 – 3 Days |
| Standing Seam Metal | $14.00 – $25.00 | 50+ Years | 3 – 5 Days |
Interestingly, industry data reveals that 67% of homeowner complaints during roofing projects stem from poor communication regarding timelines and property disruption—not structural workmanship errors. Working with an experienced contractor eliminates these headaches.
Common Installation Mistakes and Red Flags
Poor installation habits account for over 70% of prematurely failed roofs. Watch out for these warning signs during installation:
- Reusing Old Flashing: Reusing old wall or chimney flashing creates hidden leak points.
- Omitting Water Barriers: Leaving out ice-and-water shields in freeze-thaw zones violates modern IRC codes.
- High-Nailing: Driving shingle nails above the designated nail strip misses the double-thick material zone, leaving shingles vulnerable to wind blow-offs.
- Skipping Building Permits: Working without required local permits can void manufacturer warranties and complicate future home sales. Learn how to verify qualifications in our guide on the ABCs of hiring a roofer: licensing, insurance, and experience explained.
Post-Installation Inspection and Cleanup
Once construction finishes, thorough cleanup and quality inspection protect your yard and guarantee project standards:

- Magnetic Debris Sweeps: Crews run high-powered rolling magnets across the driveway, lawn, and flower beds to capture stray nails.
- Attic Check: Inspecting the attic space from inside ensures fasteners have cleanly penetrated the sheathing without splintering framing.
- Permit Sign-Off: Local building inspectors check that installations match residential codes.
- Warranty Filings: We submit all paperwork for manufacturer warranties and hand over a written workmanship guarantee.
Frequently Asked Questions About Roof Replacement
How long does a new roof installation take?
Most residential asphalt shingle projects on homes under 3,000 square feet take one to three days. Simple gabled roofs can be completed in a single day, while complex roofs with steep slopes, dormers, or damaged decking require extra time.
Can you install new shingles directly over an existing roof?
While building codes permit up to two layers of asphalt shingles, putting a new roof over an old one is rarely recommended. Overlays conceal hidden rot, trap excess heat, shorten shingle lifespans, and add structural weight to your home frame.
What building permits and inspections are required for roof replacement?
Most local municipalities require a official residential building permit for a complete tear-off and replacement under IRC Chapter 9 guidelines. This involves municipal inspections to verify proper underlayment, flashing, and ventilation standards.
Secure Your Home with Proven Roofing Excellence
The new roof installation process demands careful planning, correct layering, and technical skill at every stage. From stripping old materials down to the deck to sealing final ridge caps, following exact sequencing ensures your home stays protected against the elements for decades to come.
As a 4th-generation, family-owned company with over 65 years of hands-on experience in Salt Lake City and across the Wasatch Front, Heaton Bros. Roofing takes pride in superior craftsmanship and clear communication. If you need a thorough inspection, reliable repair, or a complete replacement, explore complete residential roofing services from Heaton Bros. Roofing and request your free estimate today.