

Why Acting Fast on Damaged Roof Repair Protects Your Home
Damaged roof repair is critical for protecting your home from escalating water damage, mold growth, and structural deterioration. Whether you’ve spotted missing shingles after a storm or noticed water stains on your ceiling, taking action within the first 24-48 hours can mean the difference between a simple fix and a costly full replacement.
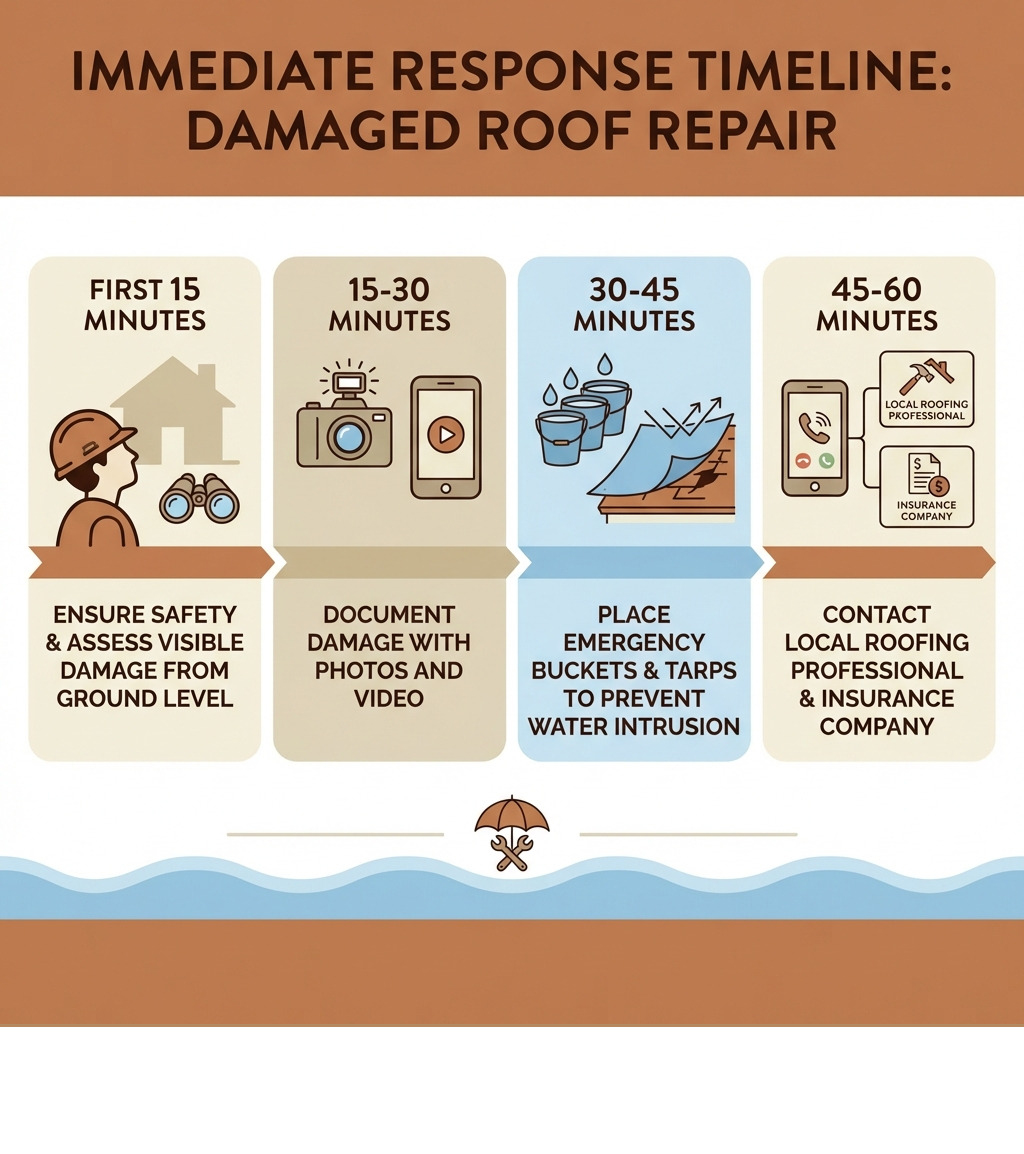
Quick action checklist for damaged roofs:
- Safety first – Stay off wet or steep roofs; inspect from the ground or attic when possible
- Stop the water – Place buckets under leaks, move furniture, and cover exposed areas with tarps
- Document everything – Take dated photos of all damage, inside and out
- Call a professional – Get an expert assessment before attempting repairs
- Contact your insurer – File claims within 24-48 hours while damage is fresh
After a storm rolls through Utah, your roof might be left vulnerable in ways you can’t see from the ground. A snapped tree branch can puncture your decking. Hail can leave soft bruises on shingles that turn into bare spots months later. Wind-driven rain can back up under shingles on low-slope areas, especially during those fierce nor’easters that hit the Wasatch Front.
The relief you feel when the storm passes can quickly turn to anxiety when you spot damage. But here’s the thing: addressing water and mold damage early can prevent thousands of dollars in repair costs down the line. Neglecting small leaks leads to roof deck saturation, which causes buckling or even caving under pressure. Water can penetrate foundations, creating cracks that compromise your entire home’s stability.
This guide walks you through everything from spotting the first signs of damage to deciding whether you need a simple repair or full replacement. You’ll learn safe inspection techniques, proper temporary fixes, how to work with insurance, and when to call in the pros.
Damaged roof repair terms at a glance:
Identifying Storm Damage and Immediate Safety Steps
Spotting damage early is the key to a successful damaged roof repair. In Utah, our weather can range from heavy winter snow in Park City to intense summer hail in South Jordan. Each type of weather leaves a unique “fingerprint” on your roof.
Common Signs of Storm Impact
When you head outside to check your home after a squall, look for these common red flags:
- Missing or Lifted Shingles: High winds can peel back shingles or tear them away completely. If you see “bald spots” on your roof or shingles scattered across your lawn in Bountiful, you have an immediate vulnerability.
- Hail Bruising: Hail doesn’t always leave a hole. Sometimes it leaves “bruises”—soft spots where the granules have been knocked off. These spots eventually fail under the UV rays of the Utah sun.
- Cracked Flashing: The metal pieces around your chimney, vents, and valleys are prone to shifting or cracking during extreme temperature swings or high winds.
- Dented Vents and Gutters: Metal components often show damage more clearly than shingles. If your aluminum ridge vent looks like it went three rounds with a ball-peen hammer, your shingles likely took a beating too.
- Ceiling Bubbles: Inside the home, a “bubble” in the ceiling paint is a sign that water is pooling behind the drywall. Don’t just ignore it; it’s a sign of active leakage.
Assessing Damage Without Risking Injury
Safety is our number one priority. We’ve been roofing in Salt Lake City for 65 years, and we know how slippery a roof can be—especially after a storm.
- Use Binoculars: You can spot most major issues like missing shingles or tree limb punctures from the safety of your sidewalk using a good pair of binoculars.
- Check the Attic: This is often the safest way to find a leak. Look for moisture on the rafters, damp insulation, or light shining through the roof deck. Local roofer insights suggest that moisture meters and infrared cameras are excellent tools for finding hidden leak paths that aren’t visible to the naked eye.
- Ladder Safety: If you must use a ladder, ensure it is on a stable, level surface. Have a second person hold the base. Never climb a roof that is wet, icy, or excessively steep. For more on safe professional standards, you can review occupational safety data.
- Ground-Level Debris: Look for asphalt granules in your gutters or at the end of your downspouts. A large amount of “sand” in the gutters indicates that your shingles are nearing the end of their lifespan or have been severely damaged by hail.
If you suspect damage but can’t see it clearly, it’s best to call for an emergency roof repair assessment.
The Damaged Roof Repair Process: DIY vs. Professional
Once you’ve identified a problem, the big question is: can you fix it yourself, or do you need to call in the Heaton Bros. team?
Step-by-Step Guide to Minor Damaged Roof Repair
For minor issues—like a single curled shingle or a tiny puncture from a small branch—a handy homeowner might tackle the fix. DIY repair costs typically range from $100 to $300 for materials.
- Fixing Curled Shingles: In warm weather, you can use a blow dryer to soften the shingle. Apply a bead of roofing cement under the edges and press it down.
- Patching Small Cracks: Clean the area and apply a specialized roof sealant over the crack. You can even sprinkle some asphalt granules (collected from your gutters) over the wet sealant to help it blend in.
- Replacing a Single Shingle: Use a pry bar to carefully lift the shingles above the damaged one. Remove the nails, slide out the old shingle, and slide in a matching replacement. Nail it down and seal the nail heads with roofing cement.
- Tools You’ll Need:
- Sturdy ladder
- Pry bar and hammer
- Roofing nails
- Caulking gun and roofing sealant/cement
- Matching shingles (always keep a spare bundle in the garage!)
For more detailed instructions, you can consult this guide on how to fix a roof leak or check out our homeowner’s guide to affordable fixes.
When to Call a Pro for Damaged Roof Repair
There is a fine line between a “weekend project” and a dangerous mistake. You should call a professional if:
- The Roof is Steep: Anything over a certain pitch requires specialized fall protection (PFAS) and experience.
- Structural Damage is Evident: If a heavy limb has snapped a rafter or punctured the plywood decking, this is not a DIY job. Replacing a damaged roof deck involves cutting out sections of the house’s “skin” and requires professional structural knowledge.
- Widespread Leaks: If you have multiple leaks, it usually indicates a systemic failure rather than a single point of entry.
- Insurance is Involved: Most insurance companies prefer—or even require—that repairs be performed by a licensed contractor to ensure the warranty remains valid.
Choosing a local expert makes a significant difference in the longevity of the repair.
Navigating Insurance Claims and Repair Costs
Understanding the financials of damaged roof repair can be the most stressful part of the process. Costs vary wildly based on the complexity of the roof and the extent of the damage.
| Damage Type | Estimated Repair Cost Range |
|---|---|
| Emergency Tarping | $300 – $1,000+ |
| Minor Shingle Repair (20-40 shingles) | $400 – $1,500 |
| Plywood/Decking Replacement | $1,000+ |
| Average Total Repair | $379 – $1,755 |
| Full Asphalt Replacement | $7,500+ |
Understanding the Financials of Roof Fixes
In the Salt Lake City area, the estimated cost to repair storm-damaged roofing often starts around $8.58 to $10.80 per square foot. However, several factors influence the final bill:
- Roof Pitch: Steeper roofs require more safety equipment and take longer to navigate, which increases labor costs.
- Material Choice: Replacing high-end metal roofing is significantly more expensive than standard asphalt shingles.
- General Contractor Overhead: If you are using a GC to supervise a larger restoration project, expect to add 13% to 22% to the total cost.
- Hidden Damage: Often, the “real” cost isn’t known until the shingles are pulled back and we see the state of the underlayment and decking.
Using a cost calculator can help you budget, but an on-site estimate is always more accurate. Our team focuses on saving you time and money by identifying the root cause quickly.
Documentation Needed for a Successful Claim
To get your insurance company to pay for your damaged roof repair, you need to be a bit of a detective.
- Photos: Take wide shots of the whole house and close-ups of specific damage.
- Storm Dates: Know exactly when the damage happened. Insurance adjusters check weather records for wind speeds and hail sizes in your specific zip code.
- Interior Log: Document any damage to drywall, insulation, or flooring.
- Professional Estimate: Having a detailed quote from a reputable roofer helps the adjuster see the “scope of work” required.
Knowing whether to repair or replace is a decision we can help you navigate during the adjuster meeting. You can find more tips on protecting your home with the right repair on our blog.
Long-Term Consequences and When to Replace
Ignoring a small ding today can lead to a disaster tomorrow. We’ve seen “minor” leaks turn into structural nightmares in homes from Lehi to Ogden.
The Risks of Ignoring Minor Issues
- Mold and Mildew: This is the “hidden” risk. Mold can begin growing in your attic within 24-48 hours of moisture exposure. It triggers respiratory issues and can be incredibly expensive to remediate.
- Compromised Insulation: Wet insulation loses its R-value. This means your furnace has to work harder in the winter, and your AC struggles in the summer, leading to skyrocketing energy bills.
- Electrical Hazards: Water and electricity don’t mix. Leaks that travel down walls can reach outlets or light fixtures, creating a fire risk.
- Structural Rot: Wood framing and trusses can dry out if caught early, but persistent moisture leads to wood rot. Eventually, the roof deck can buckle or cave in.
Addressing these issues early with expert roof repair tips is the smartest financial move a homeowner can make.
Deciding Between Repair and Full Replacement
How do you know when it’s time to throw in the towel on repairs?
- The 10% Rule: If more than 10-15% of your roof is damaged, a full replacement is often more cost-effective than piecemeal repairs.
- Age of the Roof: Asphalt shingles typically last 20–30 years in Utah. If your roof is 25 years old and suffers storm damage, a repair is likely just a “band-aid.”
- Recurring Leaks: If you’ve repaired the same spot three times, there is an underlying issue with the flashing or the roof pitch that needs a permanent solution.
- Code Compliance: In some cases, local building codes in places like Draper or Sandy may require a full replacement if a certain percentage of the roof is being touched.
If you’re on the fence, check out our guide on how to decide between replacement and repair.
Frequently Asked Questions about Roof Restoration
How long can I safely delay permanent repairs after a temporary fix?
A high-quality tarping job using 2×4 battens and mastic can hold for 30 to 90 days. However, this is only a temporary solution. Tarps can be degraded by UV rays and can be blown off by subsequent high winds. You should aim to have permanent repairs completed as soon as the weather and your contractor’s schedule allow. Delaying too long can lead to secondary damage like mold or wood rot.
Should I file an insurance claim for minor shingle damage?
It depends on your deductible. If a roofer can fix a few punctures for $300 and your deductible is $1,000, filing a claim doesn’t make financial sense. Furthermore, frequent small claims can sometimes lead to higher premiums or even policy cancellation. We always recommend getting a professional inspection first to see if the total damage exceeds your deductible significantly.
How do I choose a reliable roofing contractor for storm damage?
Don’t hire the “storm chasers” who knock on your door the day after a hail storm. Look for:
- Local Reputation: They should have a physical office in the Salt Lake City area.
- Licensing and Insurance: Verify they are licensed in Utah and carry both liability and workers’ comp insurance.
- Detailed Contracts: Never sign a contract that doesn’t specify the exact materials to be used.
- Experience: A company that has survived several Utah winters knows how to install a roof that lasts.
There are many benefits to choosing a local roofer that out-of-state companies simply can’t match.
Conclusion
At Heaton Bros. Roofing, we take damaged roof repair seriously because we know your home is your most important investment. As a 4th-generation, family-owned company with over 65 years of experience serving Salt Lake City, South Jordan, Bountiful, and the entire Wasatch Front, we pride ourselves on reliability and quality.
Whether you need a quick shingle replacement or a comprehensive new roofing system, we are here to help you move from “dings to done.” Don’t wait for the next storm to turn a small leak into a big problem.
Explore our full range of roofing services or contact us today for an expert assessment of your roof’s integrity. We’re ready to protect your home for the next generation.